Want to build a business that you can start from home and in your spare time?
What if I told you that you can start this business with almost no money upfront, minimal running costs, no employees, no customers, and no hassles? Starting to sound pretty good, right? The kicker is that this business can generate massive amounts of passive income (even thousands of dollars per month).
If this sounds interesting to you, you’re in the right place.
In this article, I am going to show you how to start a blog from scratch in 7 simple steps. I am going to explain each step in detail and provide you with some of my best pro tips along the way.
These 7 steps include how to select your niche, how to set up your website (with screenshots for each step), how to set up your underlying blogging business (logos, corporate formations, etc.), how to drive traffic to your blog, how to write amazing articles, how to measure your performance, and how to monetize your blog.
I’ll also include a section at the end that shows you how you can set up your blogging business to be run on autopilot. For me, this is the end goal. What a perfect way to leverage this amazing business to create a life where you can relax, travel, and spend time doing things that matter to you.
If you want to skip ahead to any of the steps, here are hyperlinks to each of the topics we will cover.
Step 3: Set Up Your Blogging Business and Create A Logo
Step 4: Search Analysis: Find Good Blog Post Topics (and Get Traffic!)
Step 5: How to Write Organized and Well-Written Articles
Step 6: Measure Your Blog’s Performance
Step 7: Monetize Your Blog Right Away
Structure Your Blog For Passive Income
If you would like to see a condensed version of this article in video format, check out my YouTube video on the topic below.
Is Blogging Legit?
To a lot of people, making money online sounds scammy. That’s because there are a lot of scammy websites out there.
But a blogging business is not a scam. Blogging is a proven (and massive) industry. Some of the biggest websites in the world are blogs – think The Huffington Post, NerdWallet, etc.
But you don’t need to be a mega-blog to achieve amazing cash flow through this business. A little blog run by an average guy like me gets tens of thousands of visitors and generates thousands of dollars each month (and it’s only about a year old).
You may be thinking that my results are one in a million.
Not so…check out empireflippers.com and browse some of the websites that they have for sale. You will find blogs that are just a few years old that are generating tens of thousands of dollars per month. And they are on there all of the time.
Blogging’s not a scam, but starting one the right way will require some effort and knowledge. I can’t help you with the first part, but I can definitely help you with the second. Let’s get into it!
This post may contain affiliate links. If you click on a link and complete a transaction, I may make a small commission at no extra cost to you.
The information contained in this post is for informational purposes only. It is not a recommendation to buy or invest, and it is not financial, investment, legal, or tax advice. You should seek the advice of a qualified professional before making any investment or other decisions relating to the topics covered by this article.
Step 1: Select a Niche
The first thing you need to do is figure out what you want to blog about. The topic you choose is often referred to as a “niche.” Your niche can be anything you find interesting or have some knowledge about (usually both).
Examples of popular niches include fitness, food, personal finance, lifestyle, fashion, travel, technology, gaming, etc.
You can drill down even further and write about sub-niches. For example, instead of writing about food (a gigantic niche), you can specialize in vegan cooking on a budget.
One advantage of doing this is less competition. Writing about highly specialized topics makes it easier for you to rank on Google.
I prefer to define my niche somewhat broadly but write highly specific articles within that broad niche. This way I never run out of topics and don’t get bored writing about the same thing everyday.
Note: Think twice before picking a niche like health or finance because these are “YMYL” topics. YMYL stands for “Your Money or Your Life” (but covers more than just that). It can be more difficult to succeed in YMYL niches because Google wants your site to have “EAT” (which stands for Expertise, Authoritativeness and Expertise). Source
You gain EAT through a number of ways, but newer sites, which have virtually no credibility with Google can struggle to rank.
So be mindful of that when selecting your niche – there may be greener pastures for a brand new blogger.
Step 2: Set Up Your Website
Once you have settled on your niche, it’s time to set up your website.
Step 1: Choose a Hosting Provider
The first thing to do when setting up your website is choosing a hosting provider. A hosting provider performs the essential function of allowing your website to become available through the internet.
When I started, I used Siteground (although I later migrated to Cloudways as my site grew). I’ve been pretty happy with their service because they only charge you for what you use and they are (in my opinion) a more premiere service without costing too much more.
For purposes of this tutorial, I will walk you through the process using Siteground, since they are the cheaper option (at least for the first year) and perhaps better suited for someone who is starting out and wants to save a little bit of money.
Note: Most hosting providers all follow a similar process to what I lay out below.
Step 2: Choose Your Hosting Plan
If you go to the Siteground link here, you will be asked to choose a plan. You are just starting out, so pick the cheapest one (“StartUp”) under the “Web Hosting” option.
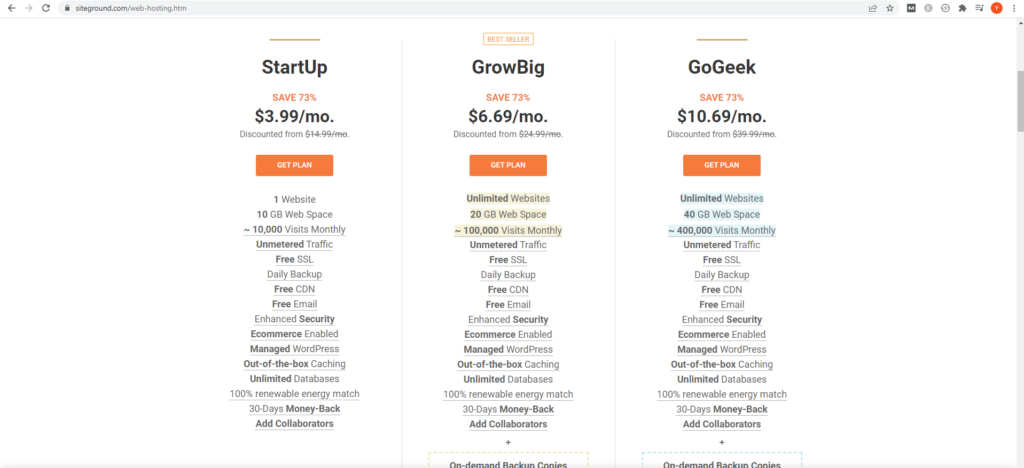
Pricing is currently $3.99 per month (although they always start and stop promotions, etc., so the pricing may vary when you go on). You want to keep in mind that the relatively low monthly price is available only if you sign up for a yearly subscription (if you go with the monthly option, it’s really expensive – like $20 a month). [Note, when I updated this post, I noticed they were running a promotion for $2.99 per month, so it’s a screaming deal]
Note that they offer a 30 day money back guarantee, so there’s little risk if you don’t like it.
Step 3: Choose Your Domain Name
Once you pay for the plan, the next prompt is going to be for your new your domain name. If you don’t know what a domain is, it’s your web address. So the domain name for this site is roadlesstraveledfinance.com. The domain name for Google is google.com. You get the idea.
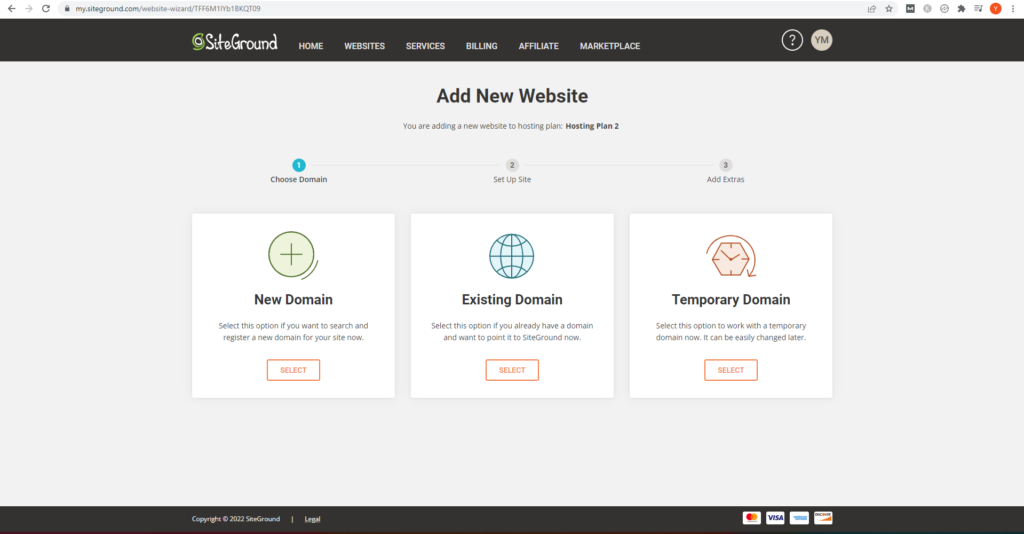
As you can see, you have three options. You can select a new domain name on the spot. You can use a domain name you purchased from a different provider. Or you can set up a temporary domain.
Unless you already have a domain, select the first option. Of course, you can save a little bit of money and buy your domain name first through places like namecheap.com (it’s around $10 per year as of the time of this writing). It’s what I do and I have had no problems, but it is an extra step.
Now, you’ve got to find a good domain that’s still available. Don’t worry, we’re going to provide some tips on how to select a good domain name. As a general rule, you want to select one that has some obvious connection to your niche.
Once you’ve found a winner, move to the next step. Note: You’ll need to pay for the new domain (around $18 at the time of this writing).
Tips When Choosing a Doman Name:
Pick a domain that ends with “.com” (especially if you are in the U.S.). These domains are the most common (and coveted) domains and are viewed by most people as more trustworthy. Also, using a .com domain will help you to focus on US traffic, which in turn, helps with monetization.
Pick a domain that has keywords that you are targeting. If you are going to be writing articles about music, you will be focusing on keywords that relate to music. We will get into keywords later, but they are essentially words or phrases that people type into Google when searching for a topic. For example if I type in “how to choose a domain name” into Google, that phrase can be a key word.
The reason why you want to include your main keyword in your domain name is that Google may rank your articles relating to that keyword higher if your domain name has that keyword too.
Don’t select a domain name that is too specific. If you want to start your blog by writing about improving your piccolo playing skills, don’t choose piccoloplayingguru.com. The number of people searching for piccolo playing tips may be small and the number of articles you can write on the topic may be similarly limited.
You don’t want to be tapped out after writing 30 posts. But if your domain name is broader (e.g., musicalguru.com), you can talk about any instrument and any topic relating to playing music.
Try to keep your domain name short. With so many domains already taken, this may be hard to do, but try to find one that has less than 20 or so characters. It will make it easier to remember and less prone to typing errors.
Step 4: Create Your New Website
After you select your domain and pay for it, you will be taken to the “Add New Website” screen.

As you can see, we have two options, but since we are talking about building a website from scratch, you will select the “Start New Website” option.
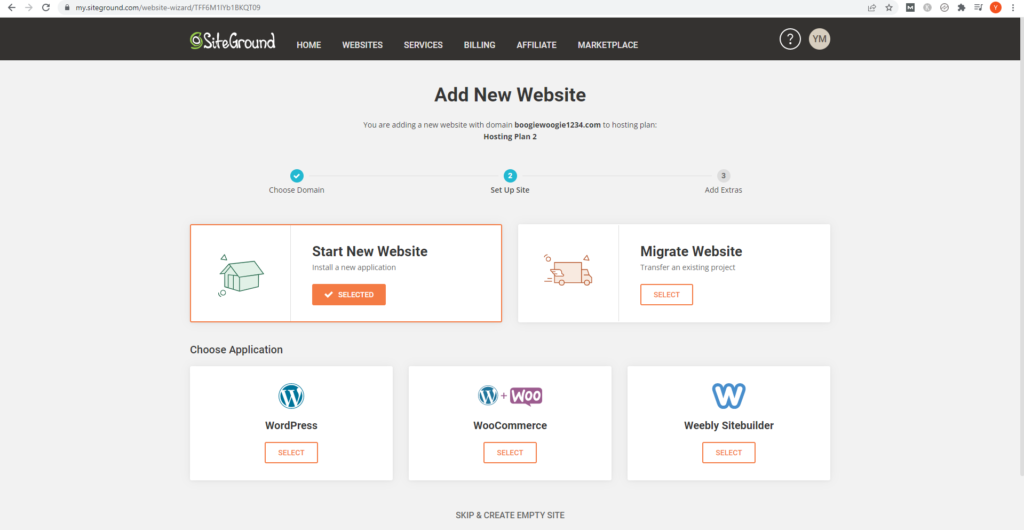
Once you click on the “Select” button, you will then be presented with three options. Choose the “WordPress” option (unless you also want to do ecommerce on your site, in which case, you can select the “WooCommerce” option).
You’ll then be asked to create log-in credentials for your wordpress application. Choose a really strong password – you definitely don’t want anyone to be able hack your website later on.
You will then be sent to the payment screen, where you can choose add-ons like SG Site Scanner and Domain Privacy.
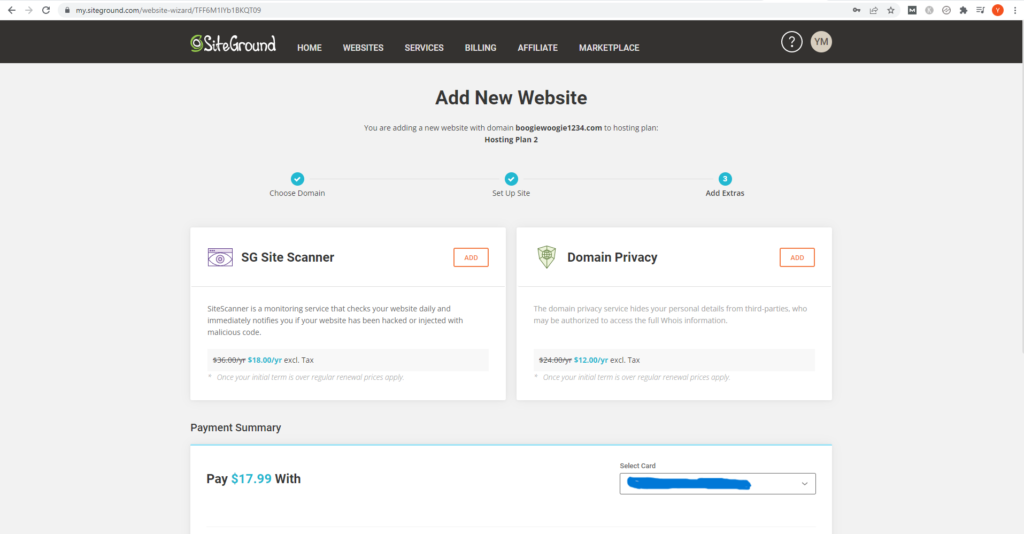
I do use the domain privacy because I don’t want anyone to know my personal information by looking up my website.
Once you pay for the domain, then Siteground will begin generating your website (it will take a few minutes). And that’s it! Your new website is up and running!
Step 5: Explore WordPress and Get Your SSL Certificate
Once your website’s up, you can access your WordPress Admin Dashboard.
You’ll be spending a lot of time here.
WordPress is your content management system and this is where you will write articles and format them, add images and videos to them, and ultimately publish them.
But before you go to the WordPress dashboard, you should head over to your “Site Tools” page. This is where you can handle certain technical aspects of your new website. One of the most important things to do here is make sure your website’s SSL is activated. Here’s a link to Siteground’s tutorial on how to do this for free.
Once you’ve taken care of the SSL, log into WordPress.
Step 6: Pick a Theme
When you first log in to WordPress, you will be asked to choose a theme, which basically governs the look and feel of your website. Explore the options and pick one that looks nice to you.
I use Astra for my sites because it is free and fast, but there are many options out there. If you just want to get started (I don’t blame you), choose their default theme (Twenty Twenty Two). Don’t get too worked about theme. Just find one that is not too bloated and slow.
Once you select a theme, WordPress will generate your website incorporating the theme. Check out your website now – it should now start looking a bit like a real website!
Step 7: Begin Your Blogging Journey
Now that your website is up and running, play around in WordPress and figure out how it works, especially how to add new posts and publish. It is very intuitive, so don’t worry.
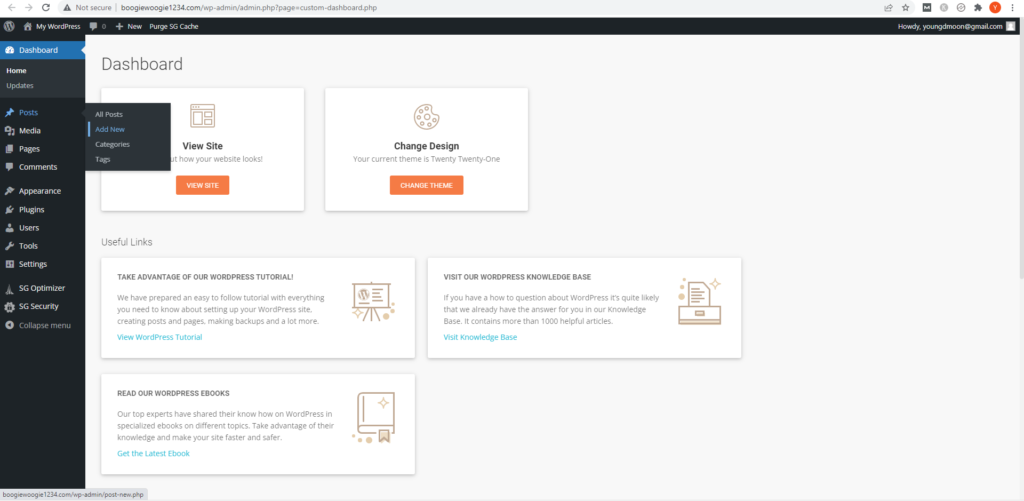
If you want to add a new blog post, go to the “Posts” section on the left of your WordPress dashboard and scroll over it – you will then be presented with an “Add New” option as shown above. Click on that and you will be taken to the screen below (or something like it, depending on your theme).
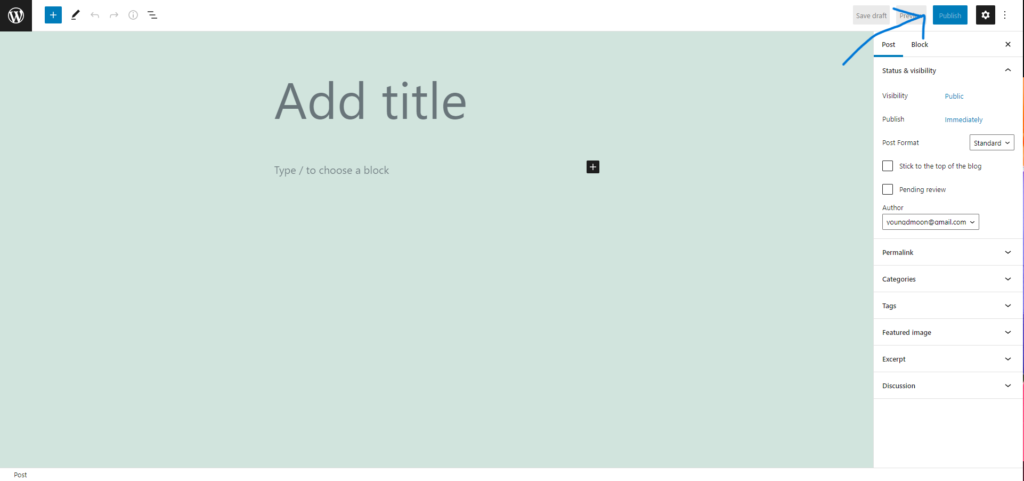
Here you can type in your title and then starting writing your blog post. Once you are done, you can press the blue “Publish” button on the upper right corner of the screen (my blue arrow is pointing to it). And that’s it, you have published your first article!
Those are the basics, but if you run across any issues, you can find a lot of help just by typing in your question on Google or YouTube.
One of the reasons why I love using WordPress is that it is powerful, but also very popular. Everyone uses it, so there are plenty of helpful tips and troubleshooting resources available.
Step 3: Set Up Your Business and Create A Logo

Establish Your Business Entity
Once you’ve set up your website, you may want to consider creating a business entity for your blogging activities.
You often see bloggers setting up a corporation, LLC, or some other business entity for their blogging enterprise. You can hire a lawyer to help you or you can use many of the online resources that can help you set up your business entity.
I like Northwest because they can get you up and running quickly and easily. They are also one of the most affordable options that I was able to find that still offered great customer service ($39 as of the date of this article).
According to their website, they are the only national registered agent service that lets you use their office address so you don’t have to use your own. That’s a killer privacy advantage.
Definitely worth checking out.

Note: You should consult with your accountant and lawyer before taking this step, so you understand the tax and legal consequences of setting up this type of organization for your business.
Create a Logo
Creating a logo is not critical but having a logo at the top of your website completes the look and adds a professional touch to your blog. It will also be helpful to have an attractive and memorable logo as your blogging business grows.
If you are a do-it yourself type, check out canva.com. If you type in “logo” into their search bar at the top, you will be presented with tons of templates (as well as a blank template) that you can use to create your own designs. If you prefer a more ready made solution, you can outsource this task.
You can go one Fiverr and get people to create logos for you. Many offer to do this for $5. For that price, you can just hire a few of the most promising people and select the best one.
Step 4: Get Traffic To Your Blog

I think this is the most important part of the article (and the part that packs the most punch in terms of actionable tips).
Why is Traffic Important?
If you want to make money blogging, you need people to visit your site. There are various ways to get visitors, but one of the most reliable (and free) ways to get significant traffic is through Google Search.
How does this work?
Let’s say you want an answer to the question, how do I make lasagna? You type it into Google and it will give a bunch of lasagna recipes, with the top results being at the top end of the page. When you click on one of those recipes, you will be directed to that website and will become its visitor.
If you are a blogger, you want to be answering these types of questions and ranking highly (near the top) on Google results. If you do, you will get many visitors who are looking for answers to their questions.
This strategy absolutely works. In fact, over 90% of this site’s traffic comes from Google Search. I love it because the more articles you write, the more traffic you can potentially get.
But getting this right is not easy. And if you get it wrong, no one will visit your website. And no visits to your site means no money for you (because advertisers will only want to place ads on your site if your site gets enough traffic).
Note: there are other ways to bring traffic to your site, such as paid ads on Google and Facebook, but that can get tricky and expensive. Social media is another way to get traffic as well, but you will need to build up your social media following to do this effectively.
We will cover a bit later on how you can use Pinterest and YouTube (in addition to Google Search) to generate free traffic to your website.
How Do I Get Free Google Search Traffic to My Blog?
Here are three basic strategies you can use to get Google Search traffic to your brand new blog. We’ll cover each in detail below.
1. Find low competition keywords (or topics)
2. Make sure there is enough search volume for that keyword (or topic)
3. Write a blog post on that topic that is better than what’s out there
1. Find Low Competition Keywords
You want to find a topic or keyword that the big players are not going after.
If you Google the term “best checking accounts” you are going to see some very familiar names at the top of the search results. These are sites that have a lot of authority and thus weight in Google’s algorithm, which ultimately decides how results get ranked.
But if you Google “best checking accounts for people with bad credit” you will see results for less familiar websites. That keyword has less competition because the bigger players are ignoring it.
If you dig deep enough, you will find keywords that are truly underserved (e.g., the top result is not on point or is a forum (like Reddit, Quora, etc.). Forum posts are fairly easy to beat out so if you find one on the front page (especially one of the top results), that’s a very good sign.
I use Moz’s chrome extension (it’s free) to see the Domain Authority of websites that show up on a search page. It lets me know at a glance how stiff the competition is.
But finding a low competition keyword or topic is not enough, you need to make sure that the topic has enough search volume to make it worthwhile.
On that note, let’s get into search volume.
2. Make Sure There is Enough Search Volume For That Keyword
It’s very hard to determine with any real certainty what the search volume for a particular topic is going to be. There are a lot of companies out there that claim to know, but only Google has the complete picture and they are not sharing that info with anybody.
But you can use some of those companies, like Ahrefs, Semrush, Ubersuggest, or a host of others to get an estimate of search volume. I use the Keywords Everywhere extension to get a sense of search volume. It costs $10 to get 100,000 credits (1 credit equals 1 keyword).
There are other methods you can use to try to gauge search volume, such as the autofill function of Google.
I am sure you have started typing in a search on Google and there were autofill options that Google generated for you. Those autofill options are gold. Google is telling you that others may have searched for that term too. You can also write blog posts that are responsive to the “People Also Ask” and “Related Searches” portions of the search results page.
These are all signals from Google that there are other people searching for this type of information, so it’s a sign of decent search volume.
Finally, you can write about topics in your niche that seem to be popping up with regularity on Reddit or Quora. You may be able to find something that is trending even before Google autocomplete recognizes it.
3. Write an Article on the Topic that is Better Than What’s Out There
Once you’ve settled on the right keyword, you want to write an article that covers the topic clearly and comprehensively. Look at the word count of the top ranking articles (and try to write about 20% more than what they did), look at the subheadings they tackle, and see if they miss anything that is relevant to the topic.
Don’t just use what others have written and reword it. If you want to leap over people, you need to bring something fresh and insightful. Try to put yourself in the shoes of you reader and give them exactly what they are looking for.
We’ll talk more about how to write clear and organized articles that can help you rank better in Step 5 below.
Consider Other Traffic Sources
Ok, so the most important thing to get right is search analysis, but there are other things you can do to potentially boost traffic to your blog.
Many people use Pinterest as a free source of traffic. I have done it as well and it does produce quick results (much quicker than trying to rank on Google). But it’s a bit of a different game.
I have found that articles that are designed to rank on Google Search are too narrow and specific to become popular on Pinterest. So you may have to make a choice.
Do you go all in on Google Search? Or write more generic articles that appeal to a Pinterest audience? I opted for the former and don’t regret it, but there are many bloggers who are wildly successful with Pinterest as their main source of traffic.
If your niche is one that resonates with Pinterest users (entertainment, recipes, women’s fashion, beauty, gardening, event planning are popular areas in Pinterest), then using that platform to generate traffic can be a great idea. Mommy blogs are also hugely popular on Pinterest.
Another option to drive traffic to your blog is by starting a YouTube channel. You can create videos on the same topics as your blog posts and point YouTube viewers to your articles. It’s not a bad option.
You send traffic to your blog and at the same time build up a YouTube channel (which can also be monetized if you gain enough watch hours and subscribers).
Another benefit of this strategy is that you can embed those same YouTube videos into your corresponding blog posts and drive traffic to your YouTube channel from your blog.
Having an embedded video in your blog post may also help you rank on Google, so there are a lot of synergies that you can create with this strategy.
That being said, creating videos is time consuming and hard. But the payoff may be worth it.
Use Great Images To Help With Engagement

Don’t forget to use great images in your blog posts. There are a couple of reasons why this is important.
First, images help to keep readers engaged and can really drive home a point you are trying to make. If you have a long block of text, especially on mobile, without any images to break it up, readers may bounce. You don’t want that.
The longer your readers are on your site, the better.
That’s because the longer they stay, the more they will be exposed to ads. This, of course, translates to more money. Secondly, a longer session signals to Google that the visitor is enjoying your content, which could lead to higher rankings.
One important word of caution about images…don’t steal them from other websites (or anywhere else). In fact, don’t use them unless you are certain that they can be used in this way. You don’t want a copyright claim to put a damper on your new business.
The safest course is to use your own images, taken with our own phone, but I understand that’s not always possible. The next safest course if to use large and reputable stock photo websites. Some offer free images, but they may have limitations on how you can use them.
Generally speaking, if you pay for them, you know you are going to be ok.
After trying a lot of different stock photo sites, I settled on canva.com. Their free version is fine, but it wasn’t good enough to satisfy my image needs. It wasn’t until I used the free trial for their paid plan that I saw what the platform could truly offer.
Their repertoire of images and videos on their paid plan (which is like $13 a month), is much better. It’s the difference between hundreds of thousands of photos and graphics and over 100 million images, videos and graphics.
In fact, they are my one-stop shop now. I use them to supply all of the images for all of my websites as well as create videos for my YouTube channel. So worth the money…
If you want to give them a try, you can click below.
Be Patient – Ranking on Google Takes Time
Many new bloggers get frustrated at how long it takes for them to get traffic.
In fact, a lot of them lose hope and give up within a few months because their blog is a ghost town.
But that’s a mistake. Ranking on Google can take some time, especially for new sites. You could have performed perfect search analysis and written the perfect blog post, but it might still take time (I am talking months potentially) for Google to index and start ranking your articles.
I did not start to see any real traffic until about 5 months in and then it shot up from there. So be patient and don’t give up. It can take up to a year before you see any meaningful results.
Step 5: Write Organized and Well-Written Articles
Everything Starts with a Compelling Title
Writing a good blog post begins with the title.
In Google search, the only thing that people can really see about your article is your title, so it needs to clearly convey the topic of your article (and tease information that will be in the article). Of course, your article should deliver on the implied promise in the title.
Your title should also contain your primary keyword (near the beginning of the title if possible) to help it rank. Don’t make your title too long (less than 60 characters is probably about right). Source
Answer the Question Clearly and Cover All Related Topics in Your Article
As for the body of the article, you should answer the question or main idea of the article at the beginning (so they know they are in the right place), but promise more detail or extra information of value later on in the article (to keep them reading).
I like to include an outline at the beginning of each article, with links to each subpart so people can jump to whatever section they want.
Your article should be accurate, with solid supporting citations or links, and have a good flow. You should try to answer the obvious questions relating to the topic at hand and try to anticipate related questions and answer them too.
Here’s one good tactic you can use. When you type in the search query on Google for your chosen keyword, check out the “People also ask” section near the top and “related searches” section near the bottom to see if you can include these topics within your article.
Grammar Is Important
No one wants to see a blog post riddled with spelling and grammatical errors. It is distracting and makes you less credible.
I suggest using tools like Grammarly.com and Hemingwayapp.com to check for spelling, grammar and stylistic errors. But despite what your English teacher taught you, don’t write long paragraphs when blogging.
These days most people are on their phones, so big blocks of text can be off putting (2-3 sentences should be the max per paragraph).
Finally, you don’t need to stuff your article with relevant keywords (and synonyms), but you should use them with enough frequency to signal to Google that your article is about the keyword topic.
Now, I am going to be honest – writing is tough and time consuming.
If you don’t have the time or inclination to do this on your own, you can hire a service to do this for you. Make Lemonade is a UK based firm that specializes in this.
I have used their content writing service to help me expand my blogs when I was running short on time and I was pleased with both their quality of writing and their rigorous keyword research process. The articles that they have written for me are generally performing well (not all of them are home runs, of course, but that’s to be expected).
Check them out here if you want to learn more.
Step 6: Measure Your Progress
Once you have your blog up and running, you want to track how it’s doing. Google Analytics and Google Search Console are two important tools to help you do that, so you should connect your website to them asap.
Google Analytics shows you various metrics relating to your website, including number of users, number of pageviews, where your traffic is coming from, etc.
Google Search Console tracks how your posts are performing in relation to Google Search. It includes the number of impressions and clicks your blog posts are getting, whether your posts are indexed on Google, keywords that you are ranking for, and much more.
Both are must-haves.
Step 7: Monetize Your Blog Right Away
Monetization is where all of your hard work starts to pay off.
Generate Ad Revenue
Once your articles start ranking on Google and you have decent traffic, your blog becomes a valuable piece of online real estate and you can start “renting out” some of that space to advertisers. For many new bloggers, Google Adsense is the most popular option (but I have a much better one, which I talk about below).
For Google Adsense, you will still need some traffic and a decent website to get accepted, but the requirements are not too bad.
I got rejected very early on (when I had no traffic and about 10 articles), but think I got accepted in my third or fourth month when I had minimal traffic, but a decent number of good quality articles, as well as the standard pages, like a Home page, About Us page, a Privacy Policy, etc.
Getting accepted to Google Adsense is a nice first step, but I did not really start making any meaningful ad revenue until I joined Ezoic.
What I like about Ezoic is that, in addition to the higher potential revenue, they offer a cost-effective and comprehensive solution for bloggers.
Let’s start with the fact that Ezoic lets you monetize your site without any traffic requirements through their Access Now program. That’s a game changer – it means that you can start making money from display ads even if you have a brand new site.
Once I made the switch from Google Adsense to Ezoic, my income literally jumped from pennies to dollars each day. But they also offer a free hosting service if you use a wordpress application to manage your content (which you should be doing anyway) and meet certain other eligibility and policy requirements.
And to round it out, they have this thing called LEAP, which can dramatically increase your core web vital scores (and it’s free to boot). Core web vitals are important because it can affect your search rankings in Google and your readers user experience.
All in all, I think it’s the best option available to bloggers who are just starting out. If you are interested in learning more about Ezoic, check them out here.

Generate Revenue Through Affiliate Marketing
Display ads are great, but they are not the only way to monetize your blog. You can also monetize through this thing called “affiliate marketing.” Let’s dive into it.
What Is Affiliate Marketing?
The concept is simple. You are basically a salesperson for a particular product that you want to promote. But instead of knocking on doors or calling people up, you “sell” the product online.
A common method of affiliate marketing is putting affiliate links on your website. As I mentioned at the top, this article contains affiliate links, but I don’t recommend products unless I am a true believer (in most cases, I am an active user of the product or service and can attest to its awesomeness). I would recommend you do the same.
Ok, back to the topic at hand.
When someone comes to a page that has your customized affiliate link and they click on it, you will earn a commission if the person buys the product (or takes some other qualifying action, like signs up, etc.)
How Do You Find Affiliate Programs?
Amazon Associates is one of the most popular affiliate programs out there. They are perfect for beginners because they have easy qualifications, carry almost every product you can imagine and are a highly trusted source for customers wanting to purchase stuff.
Love a particular product that is relevant to your niche and want to write about its benefits? Drop an amazon affiliate link in your article to the product you are recommending and make money every time someone clicks on the link and buys it.
Of course, Amazon is not the only game in town.
There are many other affiliate programs out there. Just Google any product or company you want to promote and add the words “affiliate program” to the end. You’ll find that many of them already have an affiliate program in place. All you have to do is apply.
Other great places to find affiliate programs are affiliate program networks like cj.com, flexoffers.com, awin, clickbank, impact radius, and rakuten.
Structure Your Blog For Passive Income
Ok, you are nearly there.
You know that the properly monetized articles you have written will provide passive income for you without you needing to do much more. But is there a way to make the growth of your blog passive? Of course! Here’s how.
Once you have learned how to write great blog posts, you can begin to outsource some of that work to content mills (iwriter, textbroker, fatjoe, etc.) or hire writers directly on sites like Fiverr, Upwork, or ProBlogger. As mentioned, I use Niche Website Builders, but there are lots of options out there.
Finding a good writer is tough and you will have more misses than hits. But eventually, you should be able to find a stable of writers that can produce solid content for you at a reasonable price.
Each article you add to your blog is another opportunity to increase traffic (and thus revenue), so by outsourcing the writing of new blog posts, you can make the growth of your blog passive.
As you expand, you can also hire virtual assistants to help you load articles and an editor to check them and revise them as necessary, making the process of growing your blog even more passive.
The last thing you should outsource, though, is search analysis. It’s such a crucial part of the process and everything else hinges on it, so you should hold on to that unless you find a real rock star who understands your niche and can do this better than you can.
What you can do in the meantime, though, is do your search analysis for blog post topics in an extended sitting and come up with a bunch of topics to write about.
This is called a blog content plan. If you can come up with 50 or so blog article topics, you can then feed those topics over time to your writers and sit back while they execute on your plan.
Again, a nice way to front load your work, so you can relax while your writers do the heavy lifting of creating the content that will generate passive income for you.
As mentioned already, a great option to outsource all of this work in one simple package is to use Niche Website Builders. They specialize in making blogging as passive as possible and will come up with a content plan, which includes rigorous keyword research, they will write the articles for you.
And will keep finding great topics for you to write about when you are ready for your next batch.
In fact, they can even create a blog for you from start to finish – click here to learn more about their services.
Conclusion
So there you have it – how to start a blog from scratch, with some great tips on how to be successful at each step of the process. Hope you have found this helpful and best of luck, fellow blogger!
For more great passive income ideas that won’t break the bank, check out my article on 9 Low Cost Passive Income Ideas that Work [All under $500].